A-12 Software Development Parallels #

I recently finished reading From RAINBOW to GUSTO which describes the development of the A-12 high-speed reconnaisance plane (the predecessor to/basis for the somewhat better known SR-71 Blackbird). Though a bit different from the software history/memoirs that I've also enjoyed, I did find some parallels.

Early on in the book, when Edwin Land (founder of Polaroid) is asked to put together a team to research ways of improving the US’s intelligence gathering capabilities, there's the mid-century analog of the two-pizza team:

Following Land’s “taxicab rule” — that to be effective a working group had to be small enough to fit in a taxi — there were only five members.

It turns out that cabs in the 1940s had to seat 5 in the back seat – I suppose the modern equivalent would be the "Uber XL rule".

Much later in the book, following the A-1 to A-11 design explorations, there was an excerpt from Kelly Johnson’s diary when full A-12 development had started:

Spending a great deal of time myself going over all aircraft systems, trying to add some simplicity and reliability.

That reminded me of design, architecture and production reviews, and how the simplification of implementations is one of the more important pieces of feedback that can be given. Curious to find more of Johnson's log, I found that another book has an abridged copy. I've OCRed and cleaned it up and put it online: A-12 Log by Kelly Johnson.

It's a snippets-like approximation of the entire A-12 project, and chronicles the highs and lows of the project. I highlighted the parts that particularly resonated with me, whether it was Johnson's healthy ego, delays and complications generated by vendors, project cancelations, bureaucracy and process overhead, or customers changing their minds.

Communicating With a Web Worker Without Yielding To The Event Loop #

I recently came across James Friends’s work on porting the Basilisk II classic Mac emulator to run in the browser. One thing that I liked about his approach is that it uses SharedArrayBuffer to allow the emulator to run in a worker with minimal modifications. This system can also be extended to use Atomics.wait and Atomics.notify to implement idlewait support in the emulator, significantly reducing its CPU use when the system is in the Finder or other applications that are mostly waiting for user input.

James’s work is from 2017, which is from before the Spectre/Meltdown era. Browsers have since then disabled SharedArrayBuffer and then brought it back with better safety/isolation. The exception to this is (not surprisingly) Safari. Though there have been some signs of life in the WebKit repository, it’s unclear when/if it will arrive.

I was hoping to resurrect James’s emulator to run in all modern browsers, but having to support an entirely different code path for Safari (e.g. using Asyncify) did not seem appealing.

At a high level, this diagram shows what the communication paths between the page and the emulator worker are:

Page and worker communication

Sending the output is possible even without SharedArrayBufferpostMessage can be used even though the worker never yields to the event loop (because the receiving page does). The problem is going in the other direction — how can the worker know about user input (or other commands) if it can’t receive a message event.

I was going through the list of functions available to a worker when I was reminded of importScripts1. As its documentation says, this synchronously imports (and executes) scripts, thus it does not require yielding to the event loop. The problem then becomes: how can the page generate a script URL that encodes the commands that it wishes to send? My first thought was to have the page construct a Blob and then use URL.createObjectURL to load the script. However, blobs are immutable and the contents (passed into the constructor) are read in eagerly. This means that while it’s possible to send one blob URL to the worker (by telling it what the URL is before it starts its while (true) {...} loop), it’s not possible to tell it about any more (or somehow “chain” scripts together).

After thinking about it more, I wondered if it’s possible to use a service worker to handle the importScripts request. The (emulator) worker could then repeatedly fetch the same URL, and rely on the service worker to populate it with commands (if any). The service worker has a normal event loop, thus it can receive message events without any trouble. This diagram shows how the various pieces are connected:

Page, worker and service worker communication

This demo (commit) shows it in action. As you can see, end-to-end latency is not great (1-2ms, depending on how frequently the worker polls for commands), but it does work in all browsers.

I then implemented this approach as a fallback mode for the emulator (commit), and it appears to work surprisingly well (the 1-2ms of latency is OK for keyboard and mouse input). As a bonus, it’s even possible (commit) to use a variant of this approach to implement idlewait support without Atomics, thus reducing the CPU usage even in this fallback mode.

You can see the emulator at mac.persistent.info (you can force the non-SharedArrayBuffer implementation with the use_shared_memory=false query parameter). Input responsiveness is still pretty good, compared with the version (commit) that uses emscripten_set_main_loop and regularly yields to the browser. Of course, it would be ideal if none of these workarounds were necessary — perhaps WWDC 2022 will bring us cross-origin isolation to WebKit.

Update on 2022-03-31: Safari 15.2 added support for SharedArrayBuffer and Atomics, thus removing the need for this workaround for recent versions. We didn't have to wait for WWDC 2022 after all.

  1. It later occurred to me that synchronous XMLHttpRequests might be another communication mechanism, but the effect would most be the same (the only difference is more flexibility in the output format, e.g. the contents of an ArrayBuffer could be sent over, thus better replicating the SharedArrayBuffer experience)

Archiving Mscape Software on GitHub #

Mscape SoftwareMscape Software was the “label” that I used in my late teenage years for Mac shareware programs. While having such a fake company was (is?) a surprisingly common thing, it turned into a pretty real side-gig during 1999 to 2003. I spent a lot of my hobby programming time working on Iconographer, an icon editor for the new-at-the-time 32-bit icns icon format introduced with MacOS 8.5 (and extended more with the initial release of Mac OS X). The early entries of this blog describe its initial development in pretty high detail — the deal that I had with my computer class teacher was that I wouldn’t have to do any of the normal coursework as long as I documented my progress.

All of that wound down as I was finishing up college, and I officially decommissioned the site in 2008. I’ve been on a bit of a retro-computing kick lately, partially inspired by listening to some of the oral histories compiled by the Computer History Museum, and I was reminded of this phase of my programming career. Over the years I’ve migrated everything to GitHub, which has turned it into an effective archive of everything open source that I’ve done (it also makes for some good RetroGit emails), but this earliest period was missing.

I didn’t actually use version control at the time, but I did save periodic snapshots of my entire development directories, usually tied to public releases of the program. It’s possible to backdate commits, and thus with the help of a script and some custom tooling to make Git understand resource forks I set about recreating the history. The biggest time sink was coming up with reasonable commit messages — nothing like puzzling over diffs from 23 years ago to understand what the intent was. Luckily by the later stages I had started to keep more detailed release notes, which helped a lot.

github.com/mihaip/mscape is the result of the archiving efforts, and it’s showing up as expected on my profile:

GitHub commits from 1998

I tried to be comprehensive in what is committed, so there is a fair bit of noise with build output and intermediate files from CodeWarrior, manual test data, and the like. The goal was that a determined enough person (perhaps me in a few more years) would have everything needed to recompile (there are still toolchains for doing Classic mac development).

It’s been interesting to skim through some of this code with a more modern eye. Everything was much lower-level — the event loop was not something that you could only be vaguely aware of, it was literally a loop in your program (and all other programs). Similarly, you had initialize everything by hand, do (seemingly magical) incantations to request more master pointers, and make sure to lock (and unlock) your handles. If you want to learn more about Classic Mac Toolbox programming, this pair of blog posts provide more context. Had I been aware of patterns like RAII, there would have been a lot less boilerplate (and crashing).

Speaking of C++ patterns, there are a bunch of cringe-worthy things, especially abuse of (multiple) inheritance. Need to make a class that represents an icon editor? Have it subclass from both an icon class and a document window class. It was nice to see some progression over the years to better encapsulation and data-driven code instead of boilerplate.

Another difference in approach was that there was a much bigger focus on backwards compatibility. clip2cicn and clip2icns both had 68K versions, despite it being 4-5 years since the transition to PowerPC machines begun. clip2icns and Iconographer both used home-grown icon manipulation routines (including ones that reverse-engineered the compression format) so that they could run on MacOS 8.1 and earlier, despite the icon format they targeted being 8.5-only. Iconographer only dropped Classic Mac OS support in 2003, more than 2 years after the release of Mac OS X. If I had to guess, I would attribute that to at least my not making rational trade-offs: would people that were hanging on to 5-year-old hardware be spending money on an icon editor? But I would also assume that Mac users tended to hang on their hardware for quite a while, presumably due to the higher cost.

On the business side, Brent Simmons’s recent article on selling apps online in 2003 pretty much describes my approach. I too used Kagi for the storefront and credit card processing, and an automated system that would send out registration codes after purchase. Iconographer ended selling 3,500 copies (the bulk in 2000-2003), which was pretty nice pocket change for a college student. On a lark I recreated the purchasing flow for 2021 using Stripe and it appears to be even more painless now, so modulo gatekeepers, this would still be a feasible approach today.

Making Git Understand Classic Mac Resource Forks #

For a (still in-progress) digital archiving project I wanted to create a Git repository with some classic Mac OS era software. Such software relies on resource forks, which sadly Git does not support. I looked around to see if others had run into this, and found git-resource-fork-hooks, which is a collection of pre-commit and post-checkout Git hooks that convert resource forks into AppleDouble files, allowing them to be tracked. However, there are two limitations of this approach:

  • The tools that those hooks use (SplitForks and FixupResourceForks) do not work on APFS volumes, only HFS+ ones.
  • The resource fork file is generated is an opaque binary blob. While it can be stored in a Git repository, it does not lend itself to diffing, which would ruin the “time machine” aspect of the archiving project.

I remembered that there was a textual format for resource forks (.r files) which could be “compiled” with the Rez tool (and resource forks could be turned back into .r files with its DeRez companion). This MacTech article from 1998 has more details on Rez, and even mentions source control as a reason to use it.

I searched for any Git hooks that used Rez and found git-xattr-hooks, which is a more specialized subset that only looks at icns resources (incidentally a resource I am very familiar with). That seemed like a good starting point, it was mostly a matter of removing the -only flag.

The other benefit of Rez is that it can be given resource definitions in header files, so that it produces even more structured output. Xcode still ships with resource definitions, and they make a big difference. Here’s the output for a DITL (dialog) resource without resource definitions:

$ DeRez file.rsrc
data 'DITL' (128) {
$"0003 0000 0000 0099 002F 00AD 0069 0405" /* .......?./.?.i.. */
$"4865 6C6C 6F00 0000 0000 0099 007F 00AD" /* Hello......?...? */
$"00B9 0405 576F 726C 6400 0000 0000 000C" /* .?..World....... */
$"0056 002C 0076 A002 0080 0000 0000 0032" /* .V.,.v?..?.....2 */
$"0012 008F 00C5 8816 5759 5349 5759 4720" /* ...?.ň.WYSIWYG */
$"6C69 6B65 2069 7427 7320 3139 3931" /* like it's 1991 */
};

And here it is with the system resource definitions (the combination of parameters that works was found via this commit):

$ DeRez -isysroot `xcrun --sdk macosx --show-sdk-path` file.rsrc Carbon.r
resource 'DITL' (128) {
{ /* array DITLarray: 4 elements */
/* [1] */
{153, 47, 173, 105},
Button {
enabled,
"Hello"
},
/* [2] */
{153, 127, 173, 185},
Button {
enabled,
"World"
},
/* [3] */
{12, 86, 44, 118},
Icon {
disabled,
128
},
/* [4] */
{50, 18, 143, 197},
StaticText {
disabled,
"WYSIWYG like it's 1991"
}
}
};

Putting all of this together I have created git-resource-fork-hooks, a collection of Python scripts that can be used as pre-commit and post-checkout hooks. They end up creating parallel .r files for each file that has a resource fork, and combining it back on-disk. I briefly looked to see if I could use clean and smudge filters to implement this in a more transparent way, but those are only passed in the file contents (the data fork), and thus can't read or write to the resource fork.

The repo also includes a couple of sample files with resource forks, and as you can see, the diffs are quite nice, even for graphical resources like icons:

Resource fork diff

I’m guessing that the number of people who would find this tool useful is near zero. On the other hand, Apple keeps shipping the Rez and DeRez tools (and even provided native ARM binaries in Big Sur), thus implying that there is still some value in them, more than two decades after they stopped being a part of Mac development.

An elegant [format], for a more... civilized age.

All of this thinking of resource forks made me a bit nostalgic. It’s pretty incredible to think of what Bruce Horn was able to do with 3K of assembly in 1982. Meanwhile some structured formats that we have today can be so primitive as to not allow Norway or comments. I have a lot of fond memories of using ResEdit to peek around almost every app on my Mac (and cheat by modifying saved tank configs in SpectreVR).

Once I started to develop for the Mac, I appreciated even more things:

  • Being able to use TMPL resources to define your own resource types and then have them be graphically editable.
  • How resources played nicely with the classic Mac OS memory management system - resources were loaded as handles, and thus those that were marked as “purgeable” could be automatically unloaded under memory pressure.
  • Opened resource forks were “chained” which allowed natural overriding of built-in resources (e.g. the standard info/warning/error icons).

While “Show Package Contents” on modern macOS .app bundles has some of the same feel, there’s a lot more fragmentation, and of course there’s nothing like it on iOS without jailbreaking, which is a much higher barrier to entry.

Solving Bee: An Augmented Reality Tool for Spelling Bee #

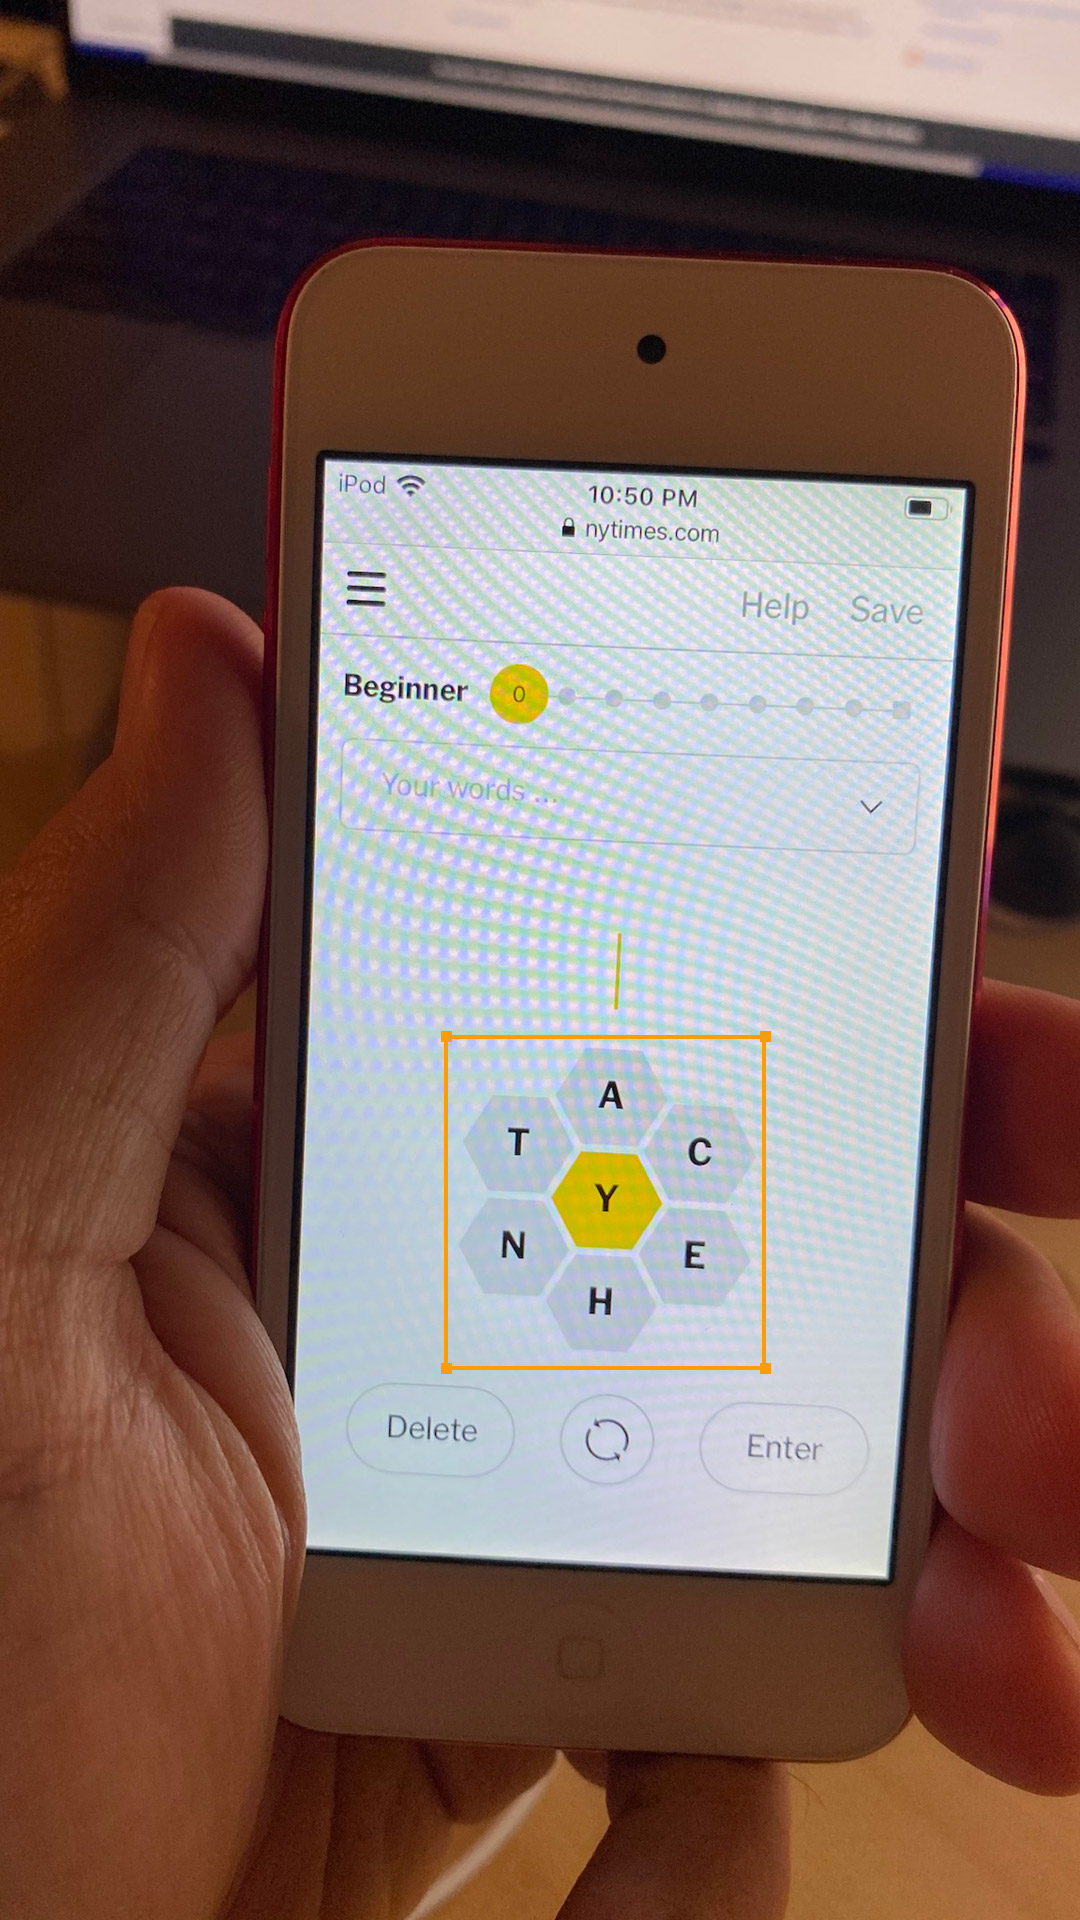
Like many others I’ve spent a lot of time over the past year playing the New York Times’ Spelling Bee puzzle. For those that are not familiar with it, it’s a word game where you’re tasked with finding as many words as possible that can be spelled with the given 7 letters, with the center letter being required. I have by no means mastered it — there are days when getting to the “Genius” ranking proves hard. Especially at those times, I’ve idly thought about how trivial it would be to make a cheating program that applies a simple regular expression through a word list (or even uses something already made). However, that seemed both crude and tedious (entering 7 whole letters by hand).

When thinking of what the ideal bespoke tool for solving Spelling Bee would be, apps like Photomath or various Sudoku solvers came to mind — I would want to point my phone at the Spelling Bee puzzle and get hints for what words to look for, with minimal work on my part. Building such an app seemed like a fun way to play around with the Vision and Core ML frameworks that have appeared in recent iOS releases. Over the course of the past few months I’ve built exactly that, and if you’d like to take it for a spin, it’s available in the App Store. Here’s a short demo video:

Object Detection

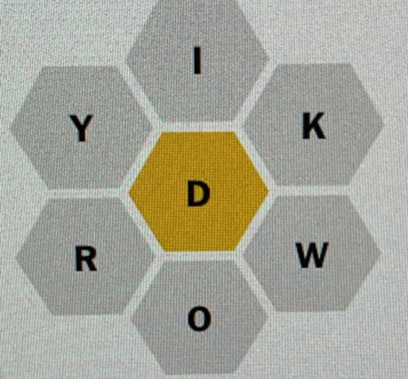
The first step was to be able to detect a Spelling Bee “board” using the camera. As it turns out, there are two versions of Spelling Bee, the print and digital editions. Though they are basically the same game, the print one has a simpler display. I ended up creating a Core ML model that had training data with both, with distinct labels (I relied on Jason to send me some pictures of the print version, not being a print subscriber myself). Knowing which version was detected was useful because the print version only accepts 5-letter words, while the digital one allows 4-letter ones.

To create the model, I used RectLabel to annotate images, and Create ML to generate the model. Apple has some sample code for object detection that has the scaffolding for setting up the AVCaptureSession and using the model to get VNRecognizedObjectObservations. The model ended up being surprisingly large (64MB), which was the bulk of the app binary size. I ended up quantizing it to fp16 to halve its size, but even more reduction may be possible.

Print edition of Spelling Bee Digital edition of Spelling Bee
Print edition Digital edition

Text Extraction

Now that I knew where in the image the board was, the next task was to extract the letters in it. The vision framework has functionality for this too, and there’s also a sample project. However, when I ran a VNRecognizeTextRequest on the image, I was getting very few matches. My guess was that this was due to widely-spaced individual letters being the input, instead of whole words, which makes the job of the text detector much harder. It looked like others had come to the same conclusion.

I was resigned to having to do more manual letter extraction (perhaps by training a separate object detection/recognition model that could look for letters), when I happened to try Apple’s document scanning framework on my input. That uses the higher-level VNDocumentCameraViewController API, and it appeared to be able to find all of the letters. Looking at the image that it generated, it looked like it was doing some pre-processing (to increase contrast) before doing text extraction. I added a simple Core Image filter that turned the board image into a simple black-and-white version and then I was able to get much better text extraction results.

Captured image of Spelling Bee Simplified image of Spelling Bee
Captured board image Processed and simplified board image

The only letter that was still giving me trouble was “I”. Presumably that’s because a standalone capital "I" looks like a nondescript rectangle, and is not obviously a letter. For this I did end up creating a simple separate object recognition model that augments the text extraction result. I trained with images extracted from the processing pipeline, using the somewhat obscure option to expose the app’s Documents directory for syncing via iTunes/finder. This recognizer can be run in parallel with the VNRecognizeTextRequest, and the results from both are combined.

Board Letter Detection

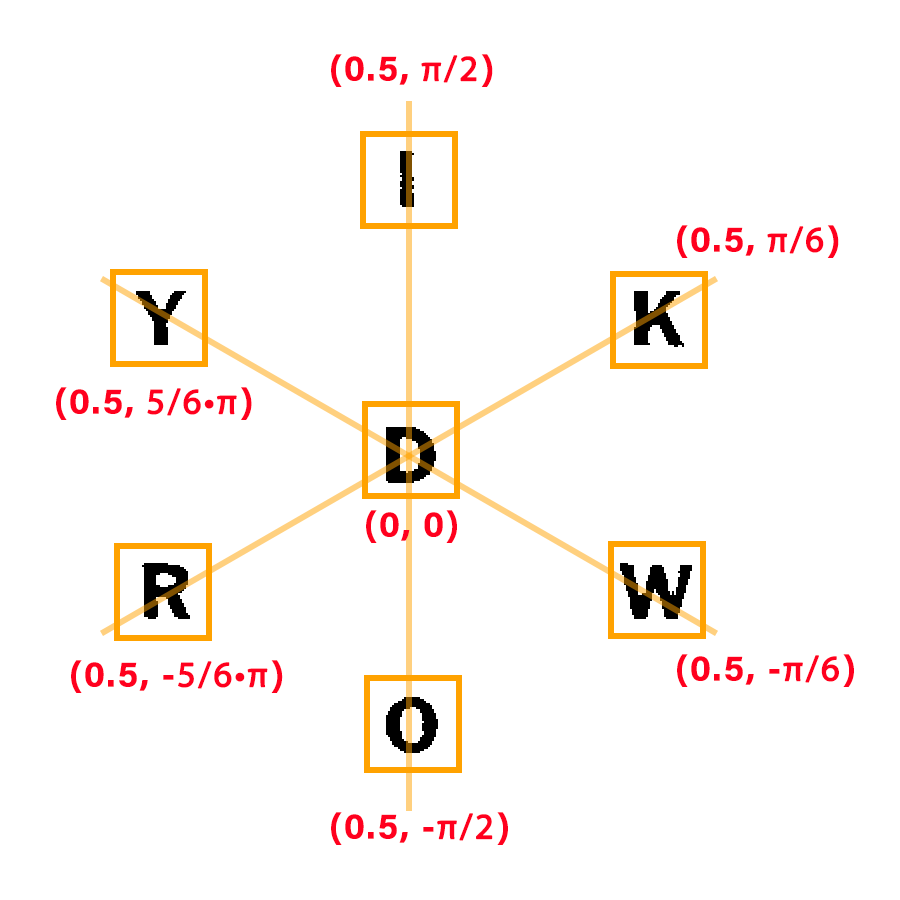
I now had the letters (and their bounding boxes), but I still needed to know which one was the center (required) letter. Though probably overkill for this, I ended up converting the centers of each of the bounding boxes to polar coordinates, and finding those that were close to the expected location of each letter. This also gave me a rough progress/confidence metric — I would only consider a board’s letter fully extracted if I had the same letters in the same positions from a few separate frames.

Polar coordinates of Spelling Bee

Dictionary Word Lookup

Once I knew what the puzzle input was, the next step was to generate the possible words that satisfied it. Jason had helpfully generated all possible solutions, but that was for the print version, which did not support 4-letter words. I ended up doing on-device solution generation via a linear scan of a word list — iOS devices are fast enough and the problem is constrained enough that pre-generation was not needed.

One of the challenges was determining what a valid word is. The New York Times describes Spelling Bee as using “common” words, but does not provide a dictionary. The /usr/share/dict/words list which is commonly used for this sort of thing is based on an out-of-copyright dictionary from 1934, which would not have more recent words. I ended up using the 1/3 million most frequent words from the Google Web Trillion Word Corpus, with some filtering. This had the advantage of sorting the words by their frequency of use, making the word list ascend in difficulty. This list does end up with some proper nouns, so there's no guarantee that all presented words are acceptable as solutions, but it was good enough.

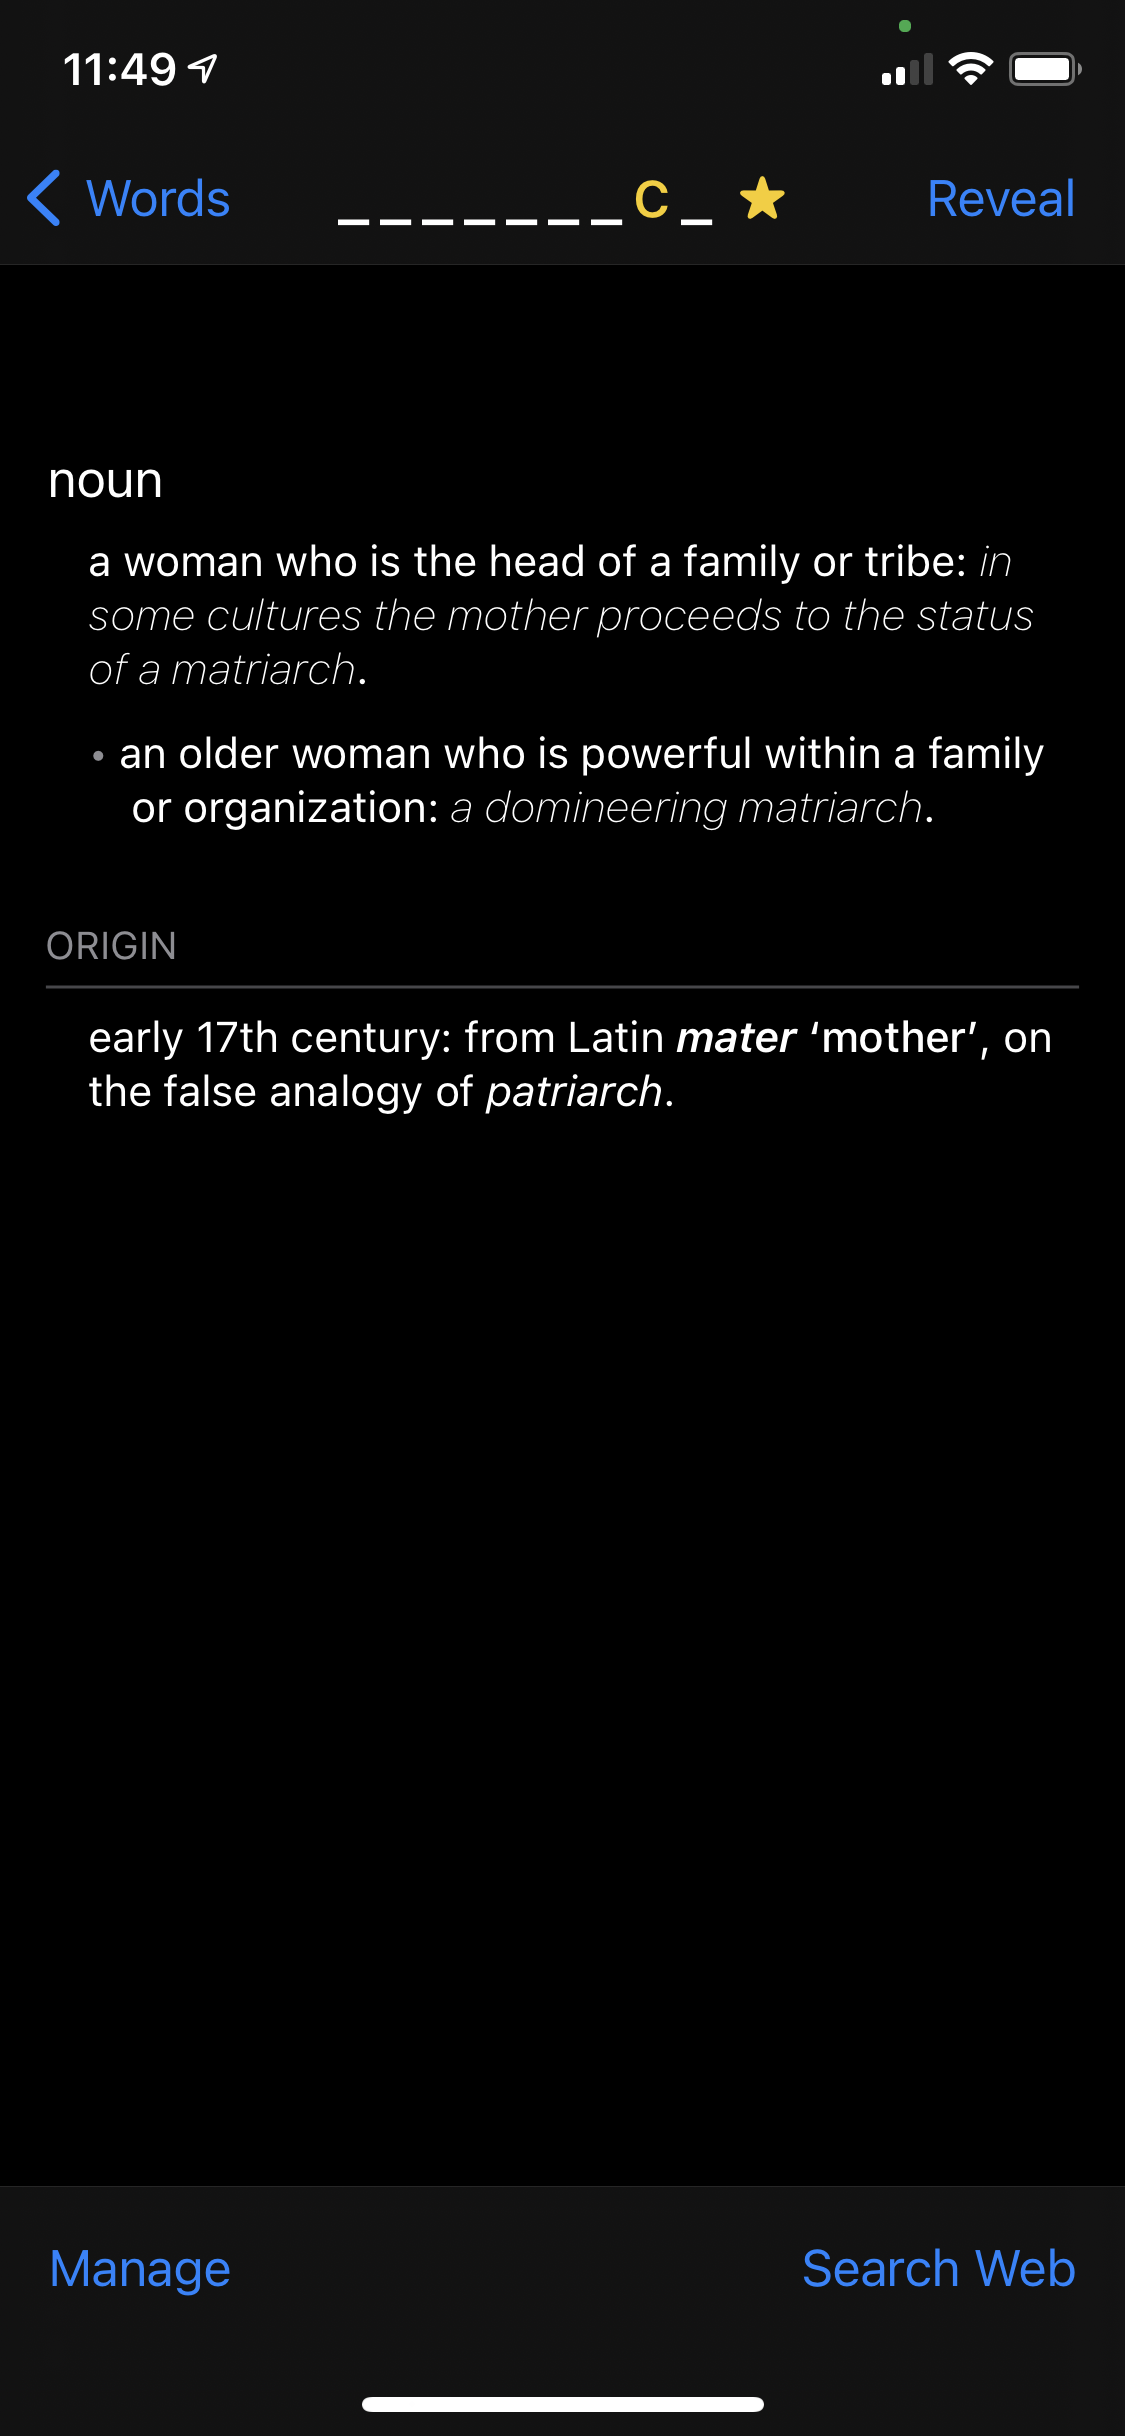
Word Definition Display

To make the app more of a “helper”, I decided to not immediately display the word list, but to have a “clue” in the form of each word’s definitions. iOS has a little-known helper for displaying word definitions - UIReferenceLibraryViewController. While this does display the definition of most words, it doesn’t allow any customization of the display, and I wanted to hide the actual word.

Word list of Spelling Bee Word definition in Spelling Bee
Word list Definition (with word hidden)

It turns out it’s implemented via a WKWebView, and thus it’s possible to inject a small snippet of JavaScript to hide and show definition. The whole point of this project had been to learn something different from the “hybrid app with web views” world that I inhabit at Quip, but sometimes you just can’t escape the web views.

Polish

Now that I had the core functionality working end-to-end, there were still a bunch of finishing touches needed to make it into an “app” as opposed to a tech demo. I ended up adding a slash screen, a “reticle” to make the scanning UI more obvious, and a progress display to show the letters that have been recognized so far.

This was a chance to experiment with SwiftUI. While it was definitely an improvement over auto-layout or Interface Builder, I was still disappointed by the quality of the tooling (Xcode previews would often stop refreshing, even for my very simple project) and the many missing pieces when it comes to integrating with other iOS technologies.

Getting it into the App Store

Despite being a long-time iOS user and developer, this was my first time submitting one of my own apps to the App Store. The technical side was pretty straightforward — I did not encounter any issues with code signing, provisioning profiles or other such things that have haunted Apple platform developers for the past decade. Within a day, I was able to get a TestFlight build out.

However, actually getting the app approved for the App Store was more of an ordeal. I initially got contradictory rejections from Apple (how can app both duplicate another and not have “enough” functionality) and all interactions were handled via canned responses that were not helpful. I ended up having to submit an appeal to the App Review Board to get constructive feedback, after which the app was approved without further issues. I understand the App Store is appealing target for scammers, but having to spend so much reviewer bandwidth on a free, very niche-y app does not seem like a great use of limited resources.

Peeking Inside

If you’d like to take a look to see how the app is implemented, the source is available on GitHub.